my-cumbria-logo, my-cumbria-logo Toggle navigation

Recording and editing audio / sound is important to a number of courses and modules at the University. These include, but are not limited to:

  • Media courses
  • Journalism
  • Education
  • Counselling
  • Social work

You may want to record audio through a computer, mobile device or dictaphone (digital voice recorders). Dictaphones are available to borrow from Ambleside, Fusehill St, Lancaster and London libraries.

After recording your audio, you may need to trim, edit or convert the file(s).

  • Windows Voice Recorder (Windows 10 App)

    Voice Recorder is an app you can use to record audio for up to three hours per recording file. You can use it side by side with other apps, which allows you to record sound while you continue working on your PC. (While there is also an older desktop program called Sound Recorder, this section is about the newer Voice Recorder app.)

    How do I record?

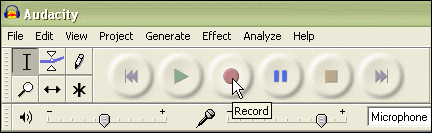
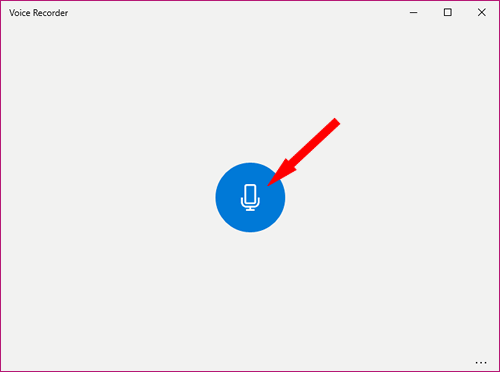
    With an audio input device plugged into the computer (microphone, headset, webcam with audio, etc.), simply click on the blus Record button to start your recording. 

    VoiceRecorder1,  

    How do I stop my recording?

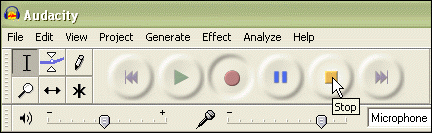
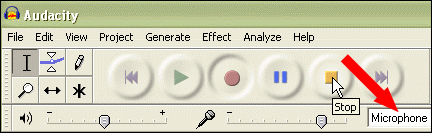
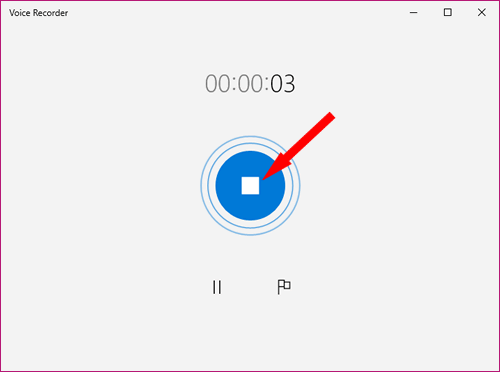
    After clicking on the record button, it changes to a Stop button. You can use this to stop and save your recording or you can use the Pause button if you want to take a momentary break and then continue with the same recording.

    VoiceRecorder2,  

    How can I rename my recording?

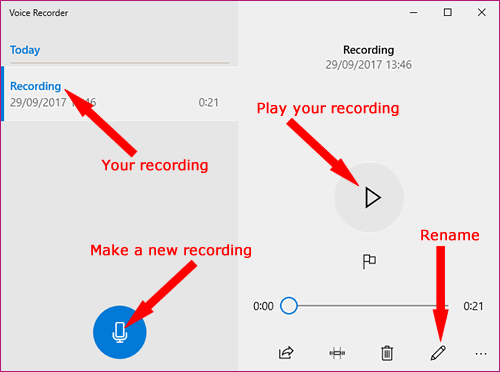
    Having stopped your recording, there is a button at the bottom of the screen that allows you to Rename it. On this screen you can also see the Play button (to hear your recording) and a repositioned Record button to start a new recording.

    Making a new recording will not affect your existing recording(s), but will create a new separate file.

    VoiceRecorder3,  

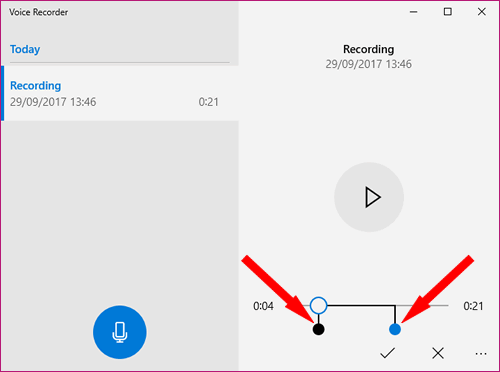
    How can I trim the beginning or end of my recording?

    Need to take the beginning and or end off your recording (clearing your throat or clicking of the mouse)? The two sliders (shown below) will allow you to drag in the edges of your recording. Use the Play button to just check that you've trimmed the right amount.

    VoiceRecorder4,  

    How can I edit my recording?

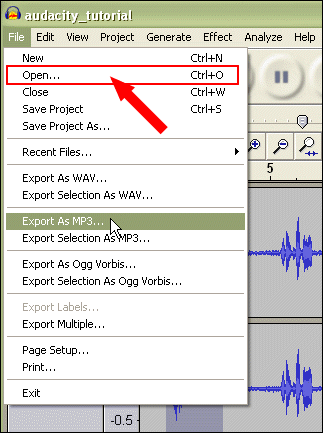
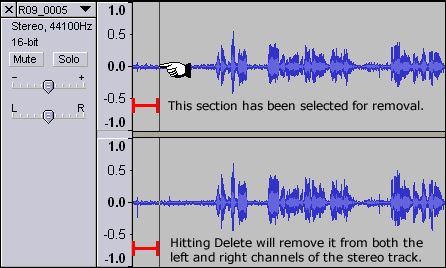
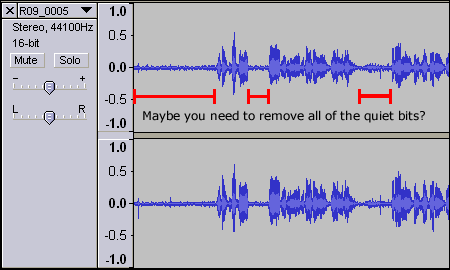
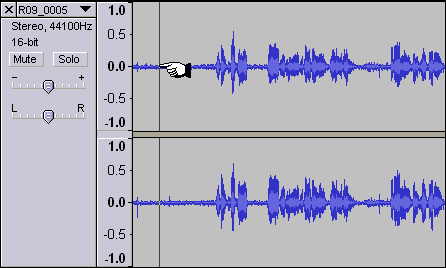
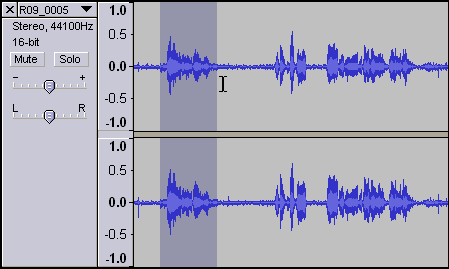
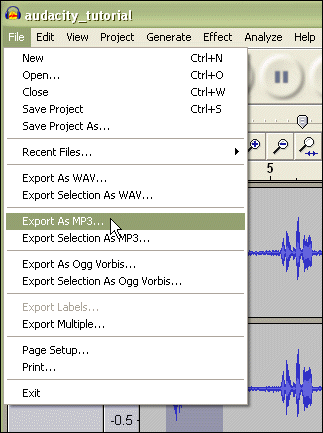
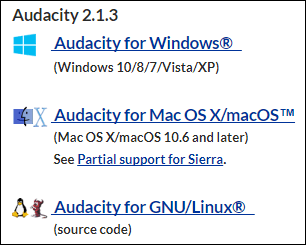
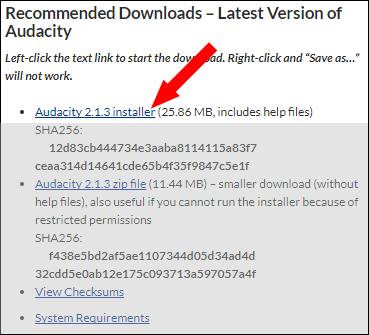
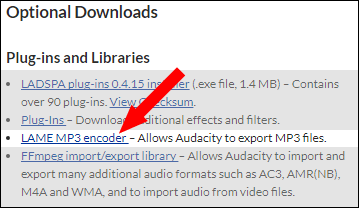
    For more complex editing, such as; removing sections, joining recordings and cleaning up things like volume or background noise, you will need to use a more comprehensive audio editing tool. See the Audacity tutorials further down this page. 

    How do I save my recording?

    If you do not edit or rename, your recording, then it is automatically saved when you pressed the Stop button.

    If you have renamed or trimmed your recording, you will need to Resave or Reject the edited file. This is done by clciking on the Tick (resave) or Cross (reject) that appear at the bottom of the screen.

    When selecting to Resave, you have the option to overwrite the original recording or save your edited version as a completely new one.

    VoiceRecorder5,  

    Where is my recording stored?

    By default, Windows Voice Recorder will save your recordings into a Voice Recorder Recordings folder. To find this folder, click on the Three Dots menu and select Open File Location.

    VoiceRecorder6,

  • Windows Sound Recorder (Desktop program)

    Sound Recorder

    The Windows Sound Recorder is the older and more simplified version of Windows Voice Recorder

    It can be useful for recording short pieces of audio (older versions are limited to 60sec recordings) or for making audio notes when reading or researching.

    AudioImage01, screenshot of an audio recording programme
    Record Audio with Sound Recorder
    1. Make sure you have an audio input device, such as a microphone, connected to your computer.
    2. Open Sound Recorder by clicking the Windows Start button. In the search box, type Sound Recorder, and then, in the list of results, click Sound Recorder. In Windows 10, use the Cortana search box.
    3. Click Start Recording.
    4. To stop recording audio, click Stop Recording.
    5. (Optional) If you want to continue recording audio, click Cancel in the Save As dialog box, and then click Resume Recording. Continue to record sound, and then click Stop Recording.
    6. Click the File name box, type a file name for the recorded sound, and then click Save to save the recorded sound as an audio file.

     Sound Recorder does not give you any editing options. See Audacity (below) for audio editing options.

  • Audacity: Beginners Tutorial (Video)

    Audacity is a completely free audio recording and editing tool. You can download and use it on Windows, Mac and Linux.

    This introductory tutorial should be enough to get most users up and running, but we have also included some further illustrated guides below.

  • Audacity: Tools and Buttons

    The Control Toolbar

    The icons on the Control Toolbar enable the user to record, edit and play sounds:

    audacity_btn_01, screenshot of audacity buttons 


    The Audio Control Buttons
    audacity_btn_02, audacity backwards button  Skip to Start If you press Play at this point, you project will play from the beginning.
    audacity_btn_03, audacity play button  Play Starts playing audio at the current cursor position.
    audacity_btn_04, audacity button  Loop   If you hold down the Shift key, the Play button changes to a Loop button, which lets you keep playing the selection over and over again. 
    audacity_btn_05, audacity record button  Record   Starts recording audio. 
    audacity_btn_06, audacity pause button  Pause   Temporarily stops playback or recording until you press pause again (or Stop). 
    audacity_btn_07, audacity stop button  Stop   Stops all recording or playing. You must do this before applying effects saving or exporting. 
    audacity_btn_09, audacity forwards button  Skip to End  Moves the cursor to the end of the last track. 
    The Editing Tools 
    audacity_tool_01, audacity tool 'i'  Selection tool for selecting the range of audio you want to edit or listen to.
    audacity_tool_02, audacity 'sand timer' tool  Envelope tool for changing the volume.
    audacity_tool_03, audacity 'pen' tool  Draw tool for modifying individual samples.
    audacity_tool_04, audacity 'magnifying glass' tool  Zoom tool for zooming in and out.
    audacity_tool_05, audacity tool, two arrows facing away from each other  Timeshift tool for sliding tracks left or right.
    audacity_tool_06, audacity tool - star  Multi tool lets you access all of these tools at once depending on the location of the mouse and the keys you are holding down.
  • Audacity: Recording Sound

    Recording Your Own Voice

    1. Ensure a microphone is either attached to or built into your computer.

    2. Open Audacity.

    3. Click the red Record button.

    4. Start talking.

    audacity_record_01, screenshot of audacity recording buttons

    5. When you've finished recording - click the Stop button.

    audacity_record_02, screenshot of audacity recording buttons

    Don't worry if you have recorded too much or if there are short quiet sections at the beginning or end - you can always cut these off later (Editing Audio / Sound section below).


    Recording Sounds That Are Playing On Your Computer

    You can also record audio that is playing through the loudspeakers on your computer. The recording process is exactly the same as above, but you must first change the sound Input Device to the sound card on your computer.

    1. Select the Input Device drop-down menu:

    audacity_record_03, screenshot of audacity recording buttonsq

    2. Your Sound Card should be displayed as one of the options (It is often a Realtek device on modern Windows computers).

    3. Following the Recording Your Own Voice instructions above; except:

    4. Instead of talking - make sure that sound is playing on your computer.

  • Audacity: Importing Audio Files

    You may want to import an audio file, into Audacity, so that you can edit the content or export as a different audio file type (Converting Audio Files below).


    To import an audio file:

    1. Open Audacity.

    2. Select Open… from the File menu.

    audacity_import_01, screenshot of audacity

    3. Browse for the file that you want to Open.


    Alternatively:

    1. Browse for your audio file.

    2. Open Audacity.

    3. Drag your audio file into the open Audacity window.

    You are now ready to Play, Edit and/or Export your file.

  • Audacity: Editing Audio / Sound Files

    The basics of editing audio files are easier than you might assume.

    Delete a Section

    To delete something, first you will click, hold and drag to select the section you want to remove (this can be at any point during your recording - beginning, end or anywhere in between):

    audacity_edit_01, screenshot of audacity  

    You can repeat this for other sections (as required).

    Then press the Delete key on your keyboard. (Note: The player must be stopped, not paused, or else this will not work.)

    audacity_edit_02, screenshot of audacity  

    If you make a mistake, hold Ctrl (Win) or Cmd (Mac) and press z.

    The computer Keyboard Shortcuts cut, copy, paste, undo and redo all work in Audacity.

    CommandWindowsMac OS
    Cut Ctrl x Cmd x
    Copy Ctrl c Cmd c
    Paste Ctrl v Cmd v
    Undo Ctrl z Cmd z
    Redo Ctrl y Cmd y
    Move a Section

    To move a section from one place to another, first select it, then hold Ctrl (Win) or Cmd (Mac) and press x (for cut).

    Move the cursor to where you want to add the cut section, and click once:

     audacity_edit_03, screenshot of audacity

    Then hold Ctrl (Win) or Cmd (Mac) and press v (for paste):

    audacity_edit_04, screenshot of audacity 

    In this example above, I have chopped out the end piece and pasted it into the beginning of the recording.

    Other Editing Tools

    There are a lot more editing options within Audacity. It is unlikely you will need to use these for a University assignment.

    When you have some spare time - have a play with the Analyse and Effects menus to hear more of what you can do.

  • Audacity: Exporting Your Finished Audio Track(s)

    If you have completed all your editing, then it's time to export an MP3.

    File menu > Export As MP3:

    audacity_export_01, screenshot of audacity

    Exporting the Finished File (Newer Versions)

    1. File menu > Export… (opens a dialog box named "Edit Metadata")

    2. Click OK.

    3. Now you can choose where to save the file and what to name it. Make sure that at the bottom, where it says "Save as type" it says MP3 Files.


  • Audacity: Converting Audio Files

    At its simplest level - Audacity can import and export WAV, AIFF, AU, FLAC and Ogg Vorbis files. By downloading the additional libmad plugin - Audacity can import MP2 and MP3 files.

    See Converting Audio Files on the Converting Files page for more information and some other options for converting audio file types.

  • Audacity: Download and Install on Your Own Computer

    These instructions are ONLY for installing Audacity on your own computer.

    1. The main download page for Audacity is: http://www.audacityteam.org/download/

    2. From here you will need to choose the version for your operating system:

    audacity_install_01, screenshot of audacity 

    3. Clicking through for your operating system will take you to the download page. On this page, you will need to select the first download link (ignore everything else in this first section which is shown as greyed-out here):

    audacity_install_02, screenshot of installing audacity

    4. When the download is finished -  click on the installer file where it downloaded (usually your Downloads folder) and follow the on-screen instructions to install.

    5. Ignore any security warnings and proceed with the installation.

    6. When the installation is complete, you can add the optional MP3 software that allows you to export your finished audio file as MP3s. Go back to the Audacity download page (at step 3 of this process) and scroll down to Optional Downloads.

    audacity_install_03, screenshot of installing audacity

    7. You only need to choose the LAME MP3 encoder link which will take you to the instructions page for LAME.

    audacity_install_04, screenshot of installing audacity 

    8. Clicking through to the LAME installation section will give you all of the information you need to download and install LAME. Please note: The are not the clearest of instructions to follow, but for most users it involves downloading and running the LAME installer.

    9. You can also add the optional FFMPEG library to Audacity - this allows you to import and export a much wider range of audio files, but is not necessary for most users. To install FFMPEG, simply repeat steps 6-9 but choose FFMPEG instead of LAME.

Edit page