Joining different files into one document
There are circumstances where you need to join multiple documents and document types together into a single file for submission. This is often true for some nursing practitioner courses.
The types of files you need to join together may be:
- Word documents + paper forms + images + scanned PDFs
and you may need to add multiples of these document types and join them in a specific order.
Web service
With the right software you can merge all of these files together on your own computer, but the Online2PDF website allows us to do this very easily and it can convert and join together any combinations of the following file types - producing a single PDF file for you to keep / share / submit:
Documents: pdf, xps, oxps, ps, rtf, txt
Images: jpg, gif, png, bmp, tif, mdi
Word: doc, docx, docm, dot, dotx, dotm, wps
Excel: xls, xlsx, xlsm, xlsb, xlt, xltx, xltm
PowerPoint: ppt, pps, pptx, ppsx, pptm, ppsm, pot, potx, potm
Publisher: pub
OpenDocument: odt, ods, odp, odg, odi, odm, odc, odf
The step-by-step process is illustrated below and you can access Online2PDF here: https://online2pdf.com/
Before you start
1. Make sure that you have access to all of your documents in one place (folder, desktop, pen drive, etc.).
2. If you have any paper documents i.e. worksheets signed-off in practice, then you will need to either scan or photograph these papers and place the electronic version in the same place as everything else you want to combine.
3. Make sure you know what order you want your documents to appear in the final combined file.
4. If you have a Word document that includes your main essay and bibliography, do some of the other documents need to sit in the middle somewhere? If so, you will need to split your Word document into pieces that allow you to shuffle other bits in between.
Adding files for converting and /or joining together
5. Open the Online2PDF website and you will see the Select files button. You can click on this to search for files or simply drag your files into this area.

6. After you have added your first file, the window will change to show you what you have already added. You can use the Browse... button to add more files or continue to drag documents into this file upload area.
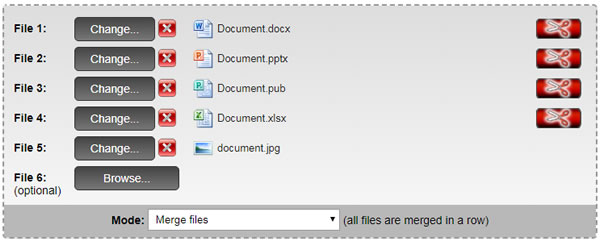
Rearranging files
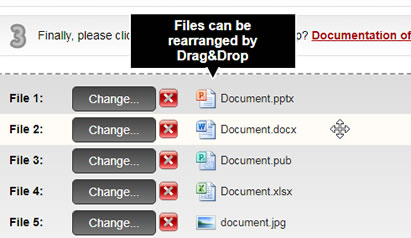
7. The file at the top of the list will be the first page(s) to appear in your combined document. You can click on any file name and drag it to a new position in the list. Reorder the document list so that your combined file displays in the correct order.
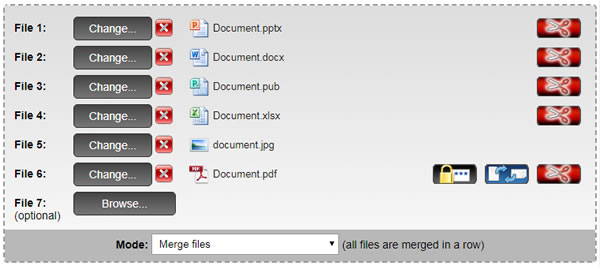
8. You can add PDFs to be combined to the other file types (or even use the service to just join some PDF files together into one document).
Editing files
9. Next to each uploaded PDF document, you have the option to rotate the page view. This is useful if you have scanned a document and it shows as being upside down.
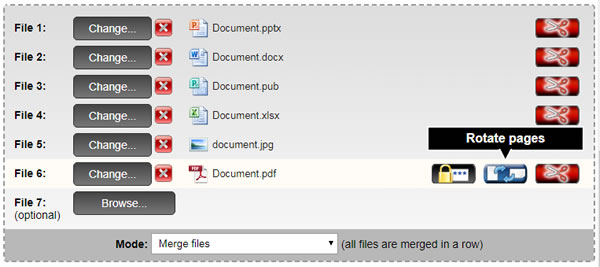
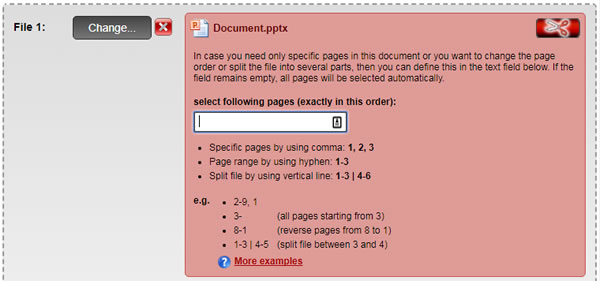
10. Against all multipage documents (so not images) you also have the choice of only including specific pages. This is available from the scissor icon next to each eligible file and is useful if you want to exclude any individual pages such as the references on a PowerPoint slide because you have included all of the references at the end (and don't need to include them twice).
Converting and merging files
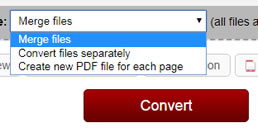
11. At the bottom of the file upload window, you have the option of what to do with these files:
- Merge files - converts everything to PDF and joins them in the order you have set
- Convert files separately - converts each document into a separate PDF document
- Create new PDF file for each page - converts everything to PDF, but outputs everything as separate pages i.e. a 5 page Word document will be returned as 5 separate PDF documents
It would be usual to leave this option as Merge files.
12. Hit the Convert button
13. The file upload window changes to tell you it is processing your request:

14. You will sometimes get an additional message to tell you it can take a little time to complete your conversion. The system is just reassuring you that it is still working.

Downloading finished document(s)
15. When the conversion and combining are complete, the screen tells you that the task is finished. Your download should now happen automatically.
If your security settings prevent the download, you will normally receive a message on screen that says something like Download blocked. This is normally accompanied by an option to accept the download.
Alternatively; you have 60 seconds to click on the Manual Download link before Online2PDF deletes your files from its server.

16. In the Google Chrome web browser, downloads show at the bottom of the window (as below). In Safari, Microsoft Edge and Firefox - you will usually see a small popup that declares your download has completed.

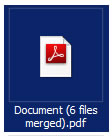
17. Your downloaded file(s) will be automatically placed into your default downloads location. This is normally a folder called Downloads. You can open the file to check you got everything right and you can now rename the file to better represent what it is i.e. ModuleCode_YourName_AssignmentNumber.pdf
Data Protection / Security
Online2PDF provide a security statement that declares that the https connection to their site is encrypted and secure. They do not retain any data beyond the conversion process and a 60 second window for you to manually download your combined file (if the auto-download does not work for some reason).
The statement is available from: https://online2pdf.com/security
