my-cumbria-logo, my-cumbria-logo Toggle navigation

There are many ways to create an audio presentation (sometimes referred to as a Podcast by your tutors), but we think the following two options are probably the easiest way to concentrate on your content and not worry too much about the technology.

  1. Record and present an audio file
  2. Record audio over a PowerPoint presentation (narrated PowerPoint)

For both options you will need to produce a text-based transcript of the spoken words, so it is probably best to create a script that will not only define what you say but will also become the transcript at the end.

  • Storyboarding / planning your presentation

    Before you even think about picking up a microphone and recording some words, you need to plan your presentation. Just like you would plan any type of assignment, you need to know what you want to say, what order you want to say it and what you conclusion is.

    If you are considering doing a narrated PowerPoint, you will also need to plan out your slides. This can make the process of creating an audio presentation easier, as you will be structuring your recording around the content that is seen on screen. Planning the visual aspects is much like the storyboarding techniques used in film making, in that you can sketch out what you want to go where and add some notes or bullet points to describe the content that will appear or be discussed before you actual start building the Presentation.

    storyboard example,

    You may want to use this technique to plan out an audio recording too, but the other option is to lay out your planning in the same way as an essay – with an introduction, main themes and conclusion.

  • Scripting your presentation

    Once you have completed your research and planned your presentation, you will need to write a script. Most of us speak around 100-120 words per minute, so a 10 minute audio presentation will need a script that is between 1000 and 1200 words.

    To get the number of words right for your presentation, try reading the following example text aloud and timing yourself. Whichever one is closest to a minute to read, defines how many words to write i.e. if you read the 100 words in a minute, then write 100 words for each minute of presentation.

    100 words

    A wonderful serenity has taken possession of my entire soul, like these sweet mornings of spring which I enjoy with my whole heart. I am alone, and feel the charm of existence in this spot, which was created for the bliss of souls like mine. I am so happy, my dear friend, so absorbed in the exquisite sense of mere tranquil existence, that I neglect my talents. I should be incapable of drawing a single stroke at the present moment; and yet I feel that I never was a greater artist than now. When, while the lovely valley teems with

    120 words

    A wonderful serenity has taken possession of my entire soul, like these sweet mornings of spring which I enjoy with my whole heart. I am alone, and feel the charm of existence in this spot, which was created for the bliss of souls like mine. I am so happy, my dear friend, so absorbed in the exquisite sense of mere tranquil existence, that I neglect my talents. I should be incapable of drawing a single stroke at the present moment; and yet I feel that I never was a greater artist than now. When, while the lovely valley teems with vapour around me, and the meridian sun strikes the upper surface of the impenetrable foliage of my trees, and but

    You will also need to pause for breath and may want to leave some deliberate short breaks (no more than a second or two) between ideas or key points, which will bring your word count down a little.

    Write a draft script and time yourself reading it. You can continue to tweak it until your message and timings are correct.

    When your script is right and is the version you are going to record, then this document becomes the transcript that you will submit alongside your recording/presentation.

  • Creating an audio-only presentation

    To record a plain audio e.g. an MP3 – you have a wide range of tools available to you, depending on the device you want to use. You can easily do this on a PC (with a microphone or headset), laptop, tablet or smart phone.

    Software

    Windows PC or laptop – there is an audio recorder built into Windows, simply search for Voice Recorder (Windows 10) or Sound Recorder (Windows 7 & 8). These are simple to use and are described on our Working with Audio page.

    Mac – There are two free apps available to do a simple voice record. These are Voice Memos and Quicktime. Basic instructions are available here: How to easily record audio on your Mac.

    Android – There are lots of options for voice recording, but the easiest to use are the built in Voice Recorder (Android 11) or the free ASR Voice Recorder app on the Play store.

    iOS – Voice Memos is probably the simplest app to use on your iPhone or iPad. More information is available here: Use the Voice Memos app

    Audacity – For a more comprehensive audio recording/editing package, Audacity is available for Windows, Mac and Linux. Getting started with Audacity is available from our Working with Audio page.

    Testing your setup

    You will probably want to do some mini recordings of a few seconds to make sure that you have your sound levels right and that there is no obvious interference (like road noise or next doors dog barking) coming through in your audio file.

    You can also test that your file works OK with VLC Audio Player, which is the one used by most of your tutors to listen back to your recording.

    Doing your recording

    Find a quiet space to do your recording and/or let others know you need silence for the duration of the recording.

    Hit the record button on your device and read from your script.

    When you have finished recording, you will want to check a few things:

    1. If given the option, please save your recording as an MP3 and give it a relevant name such as ModuleCode+Surname+StudentNumber e.g. MPGC4004Smith1234567
    2. Are you are happy with it?
    3. Is it approximately the correct length?
  • Creating a narrated PowerPoint

    The process of creating a narrated PowerPoint works best in the Office 365 version of PowerPoint. This can be done in either the desktop or web version - these instructions are for the desktop version.

    If you need the desktop version of PowerPoint 365 for your own device, University of Cumbria students and staff can download it for free using the following instructions: FREE Microsoft Office Pro

    Creating your narrated presentation

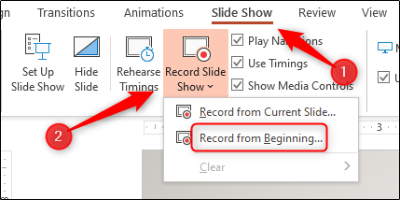
    1. Open the PowerPoint presentation in which you would like to record a voiceover narration. Head over to the “Slide Show” tab and, in the “Set Up” group, select “Record Slide Show.” Once selected, a drop-down menu will appear. Here, you can choose to start the narration from the beginning or from the current slide. If you choose to start recording from the current slide, make sure that you’re on the slide you’d like to start recording from.

    In this example, we’ll choose “Record from Beginning.”

    narrated_powerpoint_01,

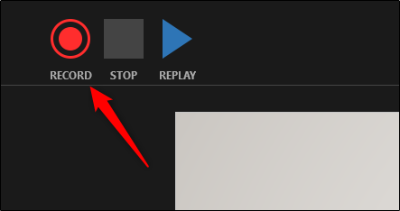
    2. Now, you’ll be in full-screen mode. You’ll notice a few extra tools appear, including a record button at the top-left corner of the screen. When you’re ready to start recording, click this button.

    narrated_powerpoint_02,  

    3. When you select the record button, a countdown timer will appear, giving you a three-second delay between clicking the button and starting your recording.

    narrated_powerpoint_03,  

    4. You can now start recording your voiceover narration! Continue through the presentation by clicking the right arrow to go to the next slide.

    narrated_powerpoint_04,  

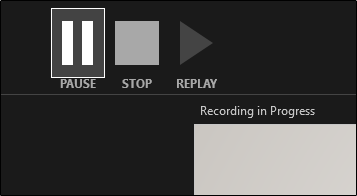
    5. You can pause the recording at any time by pressing the pause button in the top-left corner of the window. The recording will automatically end when you make it to the last slide. Alternatively, you can press the stop button, also located at the top-left corner of the screen.

    narrated_powerpoint_05,  

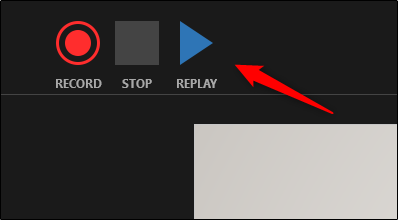
    6. If you want to play your narration back, you can select the replay button.

    narrated_powerpoint_06,

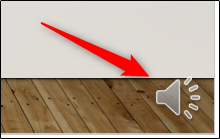
    7. A speaker icon will appear at the bottom-right corner of each slide that has a recorded narration. You can also play your narration back on each slide by hovering over the icon and pressing the play button.

    narrated_powerpoint_07,  

    8. If you’re not satisfied with the narration, simply repeat these steps to re-record.

    9. You can (optionally) save your recorded presentation as a video: Save a presentation as a video​ in PowerPoint - PowerPoint (microsoft.com)


    The content in this section was created by How To GeekHow to Record Voiceover Narration in PowerPoint (howtogeek.com)

  • Submission for marking

    Narrated PowerPoints and other media files

    Narrated PowerPoints, audio presentations or video presentations are often too large to be submitted through Turnitin and may require you to submit just the transcript, but then share the presentation with your tutors via your university OneDrive.

    Please see Sharing Media Files for Assessment on the Sharing Files page for more information.

Edit page